Loading...
Loading...
Loading...
Loading...
Loading...
Loading...
Loading...
Loading...
Loading...
Loading...
Loading...
Customizing your AirHub Portal Map with ArcGIS Online
Effective data visualization is crucial for informed decision-making. AirHub® Portal’s ArcGIS Online web map integration empowers organizations to tailor their AirHub Portal map to satisfy their organization’s unique data needs. Integrating your organization's unique data alongside AirHub® Portal’s regulatory and risk-focused data gives you a comprehensive and unified view of your airspace, ground risks, and operational activities, enabling informed decisions, optimized operations, and enhanced safety and compliance.
Our web map integration empowers you to retain complete control over your data. Creating a custom web map within your ArcGIS Online organization and adding your organization’s public or private data, ensures that your information remains secure. Once you've created your web map, simply share its link with Airspace Link. We'll register it with your AirHub® Portal organization, making your data instantly accessible to your users without compromising your data's integrity.
NOTE: Integrating your custom web map into AirHub Portal does not replace the existing AirHub Portal map. Instead, it adds new layers of data to your map, enhancing your overall situational awareness.
An ArcGIS Online organizational account
Basic understanding of ArcGIS Online and web maps
Create a Web Map in ArcGIS Online (Optional)
Note: If you don't already have a web map that contains your organization's data, follow these steps to create one in ArcGIS Online:
Log in: Sign in to your ArcGIS Online organizational account with a user type
Create a New Map: Navigate to the Map tab
Add Your Data:
Feature Layers:
NOTE: Public map sharing is preferred as it’s the easiest to configure within AirHub Portal. If you have sensitive data that cannot be shared publicly, Airspace Link can assist your organization with configuring advanced authentication, which reduces the frequency of ArcGIS Online login prompts your users will receive.
Integrate the Web Map into AirHub Portal
Obtain the Sharing URL: With your ArcGIS Online map open, copy the web map URL from the browser.
Configure AirHub Portal with the Custom Web Map: Send the Web Map URL to [email protected] along with the name of your AirHub Portal Organization. The configuration is typically completed within 24 hours.
Support for Secured Services (Optional)
If your web map is secure or it contains secured services, you may encounter a login prompt when accessing it in AirHub Portal. Consider creating an OAuth2.0 authentication application within your ArcGIS Online instance. Send the Client ID to [email protected] and we’ll configure a long-standing token for your AirHub Portal organization, minimizing the number of ArcGIS online login prompts for your users.
All data added to your web map will be overlaid on the AirHub Portal web map for all your organization’s Portal users. If you wish to update your map at any time, simply access the web map through ArcGIS online, make modifications, and save the map. When you refresh AirHub Portal next, your changes will be reflected.
Sketch Layer: A sketch layer allows users without any GIS experience to quickly add markup and annotation to the map.
Tile Layers: Tile layers are pre-rendered images, typically displaying high-resolution drone or satellite imagery.
Style and Symbolize:
Customize the appearance of your layers using symbols, colors, and labels.
Set appropriate visibility ranges.
Save and Share:
Save your map with a descriptive name. This name will be visible within the Map Styles and Layers tool within AirHub Portal.
Share the map with the appropriate permissions. You can share it with specific groups within your organization or make it public.


Configuring ArcGIS Survey123 Integration for Custom Data Collection
This guide outlines the steps for integrating Esri Survey123 custom forms with AirHub® Portal to enhance data collection for various data entities, including Operations, Users, Aircraft, and Flight Logs. Integrating Survey123 with AirHub® Portal empowers users to customize data collection for their specific needs, streamlining workflows, enhancing data quality, and providing deeper operational insights.
Note: This guide focuses on integrating Survey123 for custom data gathering slots, which is distinct from the Survey123 Work Order Requests functionality.
An ArcGIS Online account with Survey123 capabilities
The integration process involves creating your Survey123 form and then coordinating with AirSpace Link support for its configuration within AirHub® Portal.
Decide Form Location: Determine where your Survey123 form will be embedded within AirHub® Portal in terms of workflow:
Supplemental Operation Creation Information (Plan Tab): Ideal for capturing pre-flight information (e.g., weather conditions, pilot certifications, equipment checks) when creating a new operation.
Supplemental Flight Log Information (Manage Tab): Suitable for capturing post-flight information related to flight logs (e.g., anomalies encountered, maintenance requirements).
AirSpace Link will then configure your Survey123 form within AirHub® Portal, typically completing this process within 24 hours.
Please note: While AirSpace Link support can assist with initial configuration, ongoing management of your Survey123 forms remains your responsibility.


Supplemental Information for Users (Manage Tab): This location can be used for gathering additional data related to user profiles.
Supplemental Information for Aircraft (Manage Tab): This location can be used for gathering additional data related to aircraft.
Login to Survey123: Access Survey123 at https://survey123.arcgis.com/ and log in with your ArcGIS Online credentials.
Create a New Survey: Click the "Create a new survey" button on the landing page. You will have two options:
Using the web designer (Recommended): This user-friendly interface allows for visual drag-and-drop form building and is recommended for most users.
Using a survey template: Choose from pre-built templates for common scenarios and customize them. You can find the "UAS Pre-Flight Checklist" template under the "Community" tab, or access it directly at https://survey123.arcgis.com/surveys/templates/3fe63637f4ac41a88f8ba685f0e2a242 if you wish to use AirSpace Link's pre-flight checklist.
(Advanced) You can also use Survey123 Connect to create complex forms with advanced features like repeating sections and custom calculations.
Design Your Survey:
If using the web designer, you will see a blank canvas. Use the right-hand panel to explore and drag and drop desired question types onto your canvas. Available question types include single-line text, multi-line text, number, date, time, date and time, email, website, single select, multiple select, Likert scale, ranking, map, address, image, file upload, audio, and signature.
Configure each question by editing its text, answer choices, and any additional settings like required answers or default values.
Organize your questions logically for a clear user experience.
Add the Required "entityId" Field: To properly associate your Survey123 form with a specific record (entity) in AirHub® Portal (e.g., an operation, user, aircraft, or flight log), you must include a field named entityId (camel case). This field serves as the unique link between your survey data and the AirHub® Portal entity.
This entityId field should be a Singleline Text type.
This ID field can be configured as hidden within your Survey123 form if you prefer, ensuring a cleaner user interface while maintaining the crucial link.
(Optional) Adjust Appearance to Match AirHub® Portal: For visual consistency, you can adjust your Survey123 form's background color to HEX 18181B and text color to HEX FFFFFF.
Preview and Test: Click the "Preview" button to see how your form will appear to users on various devices. Test your form by completing it yourself to ensure everything functions as intended.
Publish Your Survey: Once satisfied with your form, click the "Publish" button to publish it publicly.
Configure Feature Service Editing Settings (Critical for Updates within AirHub® Portal): For seamless editing of submitted data within the AirHub® Portal (allowing previously submitted data to be recalled and updated when revisiting a form associated with a Portal entity), the associated Feature Service in ArcGIS Online must have specific editing capabilities configured.
Access: In ArcGIS Online, navigate to the "Content" section, find the Feature Layer Form View associated with your Survey123 form. Click on its item details page, then go to the "Settings" tab.
Apply the following settings: Editing Section: Under the "Editing" section, apply the following settings:
Obtain Necessary URLs and IDs: After publishing your survey, you will need to gather the following:
Survey123 Sharing URL (includes surveyid): Open the published form and copy its URL. It will look like https://survey123.arcgis.com/share/your-survey-id. The your-survey-id part is the surveyid.
Survey123 Feature Service URL (serviceURL): In ArcGIS Online, navigate to the "Content" section. Find the Feature Layer (hosted) associated with your Survey123 form (it will have the same name as your survey). Click on its item details page, and then copy the "URL" under the "Details" tab. This is your serviceURL.
ArcGIS Online Client ID (clientId): You will need to register an application in your ArcGIS Online organization to obtain a clientId. For detailed instructions on how to find or generate this, please refer to the official ArcGIS Online documentation on "Register an application" or "Authentication in ArcGIS Online."
Send Configuration Request to AirSpace Link: Once your Survey123 form is published and you have obtained the required URLs and IDs, send an email to [email protected]. In your email, include the following information:
The Survey123 Sharing URL (which contains the surveyid).
The Survey123 Feature Service URL (serviceURL).
The ArcGIS Online Client ID (clientId).
The Form location (Operations, Users, Aircraft, or Flight Logs)
The name of your AirHub® Portal Organization.

Custom Tags give managers with and AirHub Portal Organization the ability to standardize categories and identifiers, ensuring consistency when tracking operational attributes across the team. This guide covers the initial configuration of Tag Groups and individual Tags for use across the platform.
Licensing: An Airhub Portal Team License or Higher is required.
Navigate to Admin on the left-hand menu to access Tags Management.
Select an existing tag group to edit and add tags, or click "+ Create Tag Group" to create a new tag group and tags.
Define the Tag Group:
Title: Enter a descriptive name for the group (e.g., Project Name or Team Name).
When building your organization's custom tag groups, consider the data points that are most critical for filtering, reporting, and operational efficiency:
Operation Purpose: Survey, Mapping, Delivery, Security-Patrol
Project: ProjectABC, Project123
Regulatory Environment: Part-107, Waiver-12345, Restricted-Airspace
Categories/Classification: Training, Emergency Response, Inspection, R&D
ServiceNow Work Order Integration
Establish a seamless, two-way sync to create work orders from ServiceNow and update their status and deliverables back to AirHub Portal.
➕ Requires an active ServiceNow subscription and custom API endpoint setup.
🔒 AirHub Portal License: Advanced
Survey123 Work Requests
Initiate new drone work orders directly in AirHub Portal by submitting a configured Survey123 form.
➕ Requires an ArcGIS Online organizational account with Survey123 access.
🔒 AirHub Portal License: Advanced
HexGen Risk Assessments
Automated, repeatable risk insights for planned operations using the built-in HexGen geospatial modeling engine.
🔒 AirHub Portal License: Advanced
Skydio Cloud Integration
Skydio Cloud to automatically sync flight data and display live telemetry from your Skydio fleet.
➕ Requires a Skydio Cloud account and custom webhook/API key setup.
🔒 AirHub Portal License: Team or Advanced
DJI Flight Log Syncing
Sync flight logs and telemetric data automatically using the custom AirHub Sync App installed on your DJI controller.
➕ Requires installation of the AirHub Sync APK on a supported DJI controller.
🔒 AirHub Portal License: Team or Advanced
Flight Record Upload
Manually upload flight log files (e.g., CSV, TXT, KML, or Bin files) for quick record processing.
🔒 AirHub Portal License: Team or Advanced


Select Tag Color: Choose a color to visually distinguish this group in the platform.
Available For: Select which entities can utilize these tags. This is currently limited to:
Operations: For associating tags during operation planning.
Aircraft (Coming Soon): For tracking aircraft-specific attributes.
Click Save Tag Group. The group is now created and appears in the Tags list.
Add Tags to the Tag Group:
Use the Add Tag field to enter the name of an individual tag.
Click the Create New Tag button after entering the tag name.
Click Save Tag Group.
Teams: Team1, Team2, Team3


Step by step guide to connect your Skydio Cloud account to AirHub Portal
Learn how to integrate AirHub Portal with Skydio Cloud to automatically sync flight data and display live telemetry from your Skydio fleet.
Log into cloud.skydio.com
Select Settings
Enable "GPS & Telemetry"
Select Settings
Under the "Developer" section select "Webhooks"
In the top right corner, select "Create Webhook"
Name the Webhook "AirHub Portal"
Live Flight Alert:
Select Settings
Under the "Settings" section select "Alerts"
In the top right corner select "Add Alert"
Enter the following:
Post-Flight Sync Alert:
Select Settings
Under the "Settings" section select "Alerts"
In the top right corner select "Add Alert"
Enter the following:
Select the "Integrations" tab in the main navigation
Select "+ Add Custom Integration"
Under "Token Name" enter "AirHub Portal"
Select the desired group(s) this integration is intended for. If you would like all aircraft to be included, select "(Entire Organization)"
The Live Flight Viewer's functionality and display are controlled by specific URL parameters. These dictate what data is shown and how the map initially appears.
Base URL Structure:
https://flysafe.airspacelink.com/?mode=live-flight&apiKey={YOUR_API_KEY}&orgId={YOUR_ORG_ID}&loc={LATITUDE},{LONGITUDE},{ZOOM_LEVEL}z&programId={YOUR_PROGRAM_ID}
mode: mode=live-flightFunction: Specifies the viewer's operational mode. For the Live Flight Viewer, this will always be live-flight, ensuring real-time drone activity is displayed.
Value: live-flight
apiKey: apiKey={YOUR_API_KEY}
Function: A unique identifier for authentication, allowing access to Airspace Link services.
orgId: orgId={YOUR_ORG_ID}
Function: Your organization's unique identifier within the Airspace Link platform. This ensures the map displays data specific to the organization.
loc (Location): loc={LATITUDE},{LONGITUDE},{ZOOM_LEVEL}z
Function: Sets the initial geographic center and zoom level of the map. The z suffix for the zoom level is critical. A value of 15 (streets level) is recommended.
Example Syntax: loc=42.32718,-83.03792,13z
programId: programId={YOUR_PROGRAM_ID}
Function: Filters data relevant to a specific program. This parameter is required only if multiple organizations belong to a specific program.
To configure the custom embed URL, the following details are needed:
API Key (apiKey) and Organization ID (orgId):
Retrieval: Obtain both the unique apiKey and orgId from the Obelix team.
Map Centering Location (loc):
Retrieval: Get the Latitude and Longitude for the initial map location from AirHub Portal's b4ufly widget., the coordinates are displayed with each click on the map.
Program ID (programId):
Retrieval: If applicable (i.e., if multiple organizations belong to a program), the Obelix team will create the specificprogramId.
To configure the <iframe> syntax for embedding, update the src URL with that constructed from the prior steps, adjust the name, height, and width as necessary.
<iframe src="https://flysafe.airspacelink.com/?mode=live-flight&apiKey=???&orgId=org_???&loc=42.32718%2C-83.03792%2C15z&programId=???"
style="border:0px #ffffff none;" name="Live Flight Viewer" scrolling="no"
frameborder="1" marginheight="0px" marginwidth="0px" height=600px width="1000px"
allowfullscreen></iframe>Alert Name: AirHub Portal Live Flight Data
Receive notification for the following event: "Flight status changed"
Apply this alert to the following vehicles or docks: Select individual desired vehicles, or select "Apply to entire organization"
Toggle the "Webhook" action and select the previously created "AirHub Portal" webhook
Alert Name: AirHub Portal Post-Flight Sync
Receive notification for the following event: "Flight telemetry available"
Apply this alert to the following vehicles or docks: Select individual desired vehicles, or select "Apply to entire organization"
Toggle the "Webhook" action and select the previously created "AirHub Portal" webhook
Enable the following Permissions:
Flight Telemetry: Read-Only
Flights: Read-Only
Live Stream: Read-Only
Live Telemetry: Read-Only
Users: Read-Only
Vehicles: Read-Only
Webhooks: Read-Only
Copy the API Token Secret and provide it to your AirHub Portal customer success representative
Stand by, and once you are notified your account is configured, all new flight activity will be logged, and your live aircraft position will be visible in the Operations Center.


This guide will walk you through installing the AirHub Sync App for DJI on your compatible Android-based DJI controller to enable automatic flight log syncing with your AirHub Portal account.
Compatibility
Supported AirHub Portal Organizations: Your Organization must have a ‘Team’ or “Advanced’ license.
Supported Controllers: DJI RC Pro controllers running DJI Pilot 2 app.
Supported DJI Ground Control Station (GCS) Apps: DJI GO/GO 4 and DJI Pilot/Pilot 2.
Unsupported: iOS devices and the DJI Fly GCS application.
Step 1: Download the AirHub Sync App APK
(Before you begin, ensure your DJI controller has an active internet connection (Wi-Fi or cellular data)).
The AirHub Sync App is provided as an Android Package Kit (APK) file for direct installation on DJI enterprise controllers.
On your DJI controller's web browser, navigate to the following URL to download the APK file: https://tinyurl.com/airhubsync
The download should begin automatically. Once complete, you may see a notification in your device's notification bar.
Step 2: Enable Installation from Unknown Sources
For security reasons, Android devices (including DJI controllers which run a custom version of Android) typically block installations from sources other than official app stores. You will need to temporarily enable this setting.
Go to your DJI controller's Settings menu.
Look for options like Security, Apps & notifications, or Privacy.
Find a setting related to Install unknown apps or Unknown sources.
Step 3: Locate and Install the APK
Open the File Manager or Downloads app on your DJI controller.
Navigate to the folder where you downloaded the APK file
Locate the AirHub Sync App APK file (e.g., airhub-sync-v0.0.4.APK).
Tap on the APK file to begin the installation process.
Step 4: Login to AirHub Portal
After the initial app setup and permissions are granted, you will be directed to the login process.
The app will present a login screen.
Enter your Email Address associated with your existing AirHub Portal organizational account.
Tap Continue.
Next, enter your password for your AirHub Portal account.
Step 5: First-Time App Launch and Permissions Setup
Upon first launch, the AirHub Sync App will guide you through necessary permissions and folder selection.
After logging in, the app will request Required Permissions. These are essential for the app to access flight logs. Tap Allow or the appropriate option to grant permissions.
Step 6: Syncing Your Flight Logs
Once you have successfully logged into the AirHub Sync App, the app is configured to handle your flight log syncing. There are two primary methods: manual syncing and automatic background syncing.
Manual Syncing:
To manually sync, click the icon next to the flight log in the list (the cloud with an arrow).
Automatic Background Syncing:
The AirHub Sync App supports seamless automation, operating in the background to simplify your workflow.
To activate automatic background syncing, navigate to “Settings” and toggle on automatic file sync. Now, once a flight concludes, the app intelligently detects the newly generated DJI flight record file on your device. It then securely and automatically transmits this file to your AirHub Portal account without requiring any further manual intervention.
Step 7: Confirm Flight Log Syncing
Once files are synced (either manually or automatically), flight logs are created in your AirHub Portal account. Navigate to to confirm files are syncing properly.
HexGen is the geospatial aggregation and modeling engine developed by Airspace Link. It enables the transformation of complex and distributed geospatial data into a common, unified data surface. This capability allows users to turn data into insights and insights into action.
One way to leverage the power of HexGen is with Automated Operation Risk Assessments. This digital risk assessment tool enables rapid, repeatable, and reliable risk insights for your planned operations. Use the generated surface and associated metrics to determine if your planned operation exceeds any risk thresholds for your organization, and capture metrics for waiver or COA requirements.
Prerequisites:
[For Advanced and Enterprise] A user assigned the Planner user type
How to use:
Select HexGen widget at the top left corner of the map view
This widget is visible in the operation creation form when a valid operation volume has been drawn, and in the operation details view after the operation has been created.
Click the “Select Surface Profile” button
For
Best Practices
The HexGen risk assessment is best used as part of an organization operation planning policy. The HexGen risk assessment can provide a common, repeatable method to consistently analyze operation risks based on geospatial features in the operation area. For Advanced or Enterprise users, it is best practice to create specific HexGen Surface Profiles for common operation types or categories that require unique operation risk assessment parameters. This enables all operations of that type or category to have consistent risk exposure metrics.
Upgrade today!
For more information on upgrading to the Team or Advanced bundle, !
Other HexGen Details
Basic Risk Profile: Contains the following features and associated risk scores
Prisons: 10
Schools: 10
Helipads: 10
Hospitals: 8
Note: The exact path and wording for this setting may vary slightly depending on the specific DJI controller model and its Android version, but the principle of allowing installation from non-app-store sources is universal.
A prompt will appear asking for permissions the app requires. Review these permissions and then tap Install.
You might encounter a warning about the risks of installing apps from unknown sources. If presented, accept the risk to proceed with the installation.
Once the installation is complete, you will see an "App installed" message. You can tap Done or Open.
Tap Confirm or Login.
If your account is associated with multiple organizations in AirHub Portal, you will be prompted to Choose an Organization to Continue. Select the relevant organization.
For Advanced or Enterprise users, you may select an AirHub Profile or one of your own profiles (See Surface Profile How-to guide)
Select the desired resolution (higher resolution will generate smaller hexagons in the surface)
Click Analyze
Interact with the surface on the Map my clicking on individual hexes, or view the graphical surface risk metrics.
Railroad Lines: 5
Parks: 4
Transmission Lines: 2
Electric Substations: 2
FAA Obstacles: 2

This guide outlines the process for integrating Survey123, an external data collection tool, with the AirHub® Portal. The goal is to enable a seamless two-way flow of work order data: allowing work orders to be created in the Portal from Survey123 and reflecting Portal status updates back into the original Survey123 feature layer.
The integration involves a two-way communication setup:
Inbound Flow (Survey123 to AirHub® Portal - Work Order Creation):
A user submits a Survey123 form.
This triggers an event (e.g., a webhook associated with the Survey123 form submission) to send data.
A Power Automate Flow (Inbound) receives this data, transforms the Survey123 format into Airspace Link's standard work order schema.
Before configuring the integration, essential information and access are required from the customer:
Familiarize yourself with how they intend to use Survey123 for work order intake.
Understand the design of their proposed Survey123 form and the fields they plan to use.
Customer's Survey123 Form URL: The URL of the specific Survey123 form that will be used for work order creation.
Customer's ArcGIS Online Credentials (Optional): If Airspace Link will be setting up the Power Automate flows on their behalf, these credentials may be needed (decision pending on who creates/manages the PAFs).
Schema & Field Mapping:
This section covers the configuration steps on the Airspace Link side.
Draft Inbound Power Automate Flow: Create a Power Automate flow designed to trigger upon a Survey123 form submission and receive its data. This flow will generate a unique URL (if triggered by HTTP request).
Draft Outbound Power Automate Flow: Create a Power Automate flow designed to receive updates from the Airspace Link Portal and publish them back to the Survey123 feature layer.
Obtain Outbound URL (If applicable): If the Survey123 form isn't directly triggering the Power Automate flow, but rather a webhook that then calls an HTTP request, note the unique HTTP request URL generated by Power Automate. This will be used in Airspace Link's org.json configuration.
Navigate to the org.json configuration file in the Airspace Link GitHub repository (specific location to be provided by engineering).
For each environment (e.g., Development, Staging, Production), add a new entry for the customer's organization.
Required Data for Each Organization Entry:
Objective: The customer creates their Survey123 form to collect work order requests.
Action: The customer will design and publish their Survey123 form.
Best Practice: Encourage the customer to use a provided Airspace Link schema template to simplify subsequent field mapping.
Objective: To receive Survey123 data and create a work order in AirHub® Portal.
Action: Configure the Power Automate flow:
Trigger: Set to "When a new survey response is submitted" (or "When an HTTP request is received" if using webhooks).
Field Definition:
Objective: To receive work order updates from AirHub® Portal and apply them back to the original Survey123 record.
Action: Configure the Power Automate flow:
Trigger: Set to "When an HTTP request is received" (from AirHub® Portal).
Action:
Thorough testing is crucial to ensure the two-way integration works as expected.
Test Inbound Flow: Submit a Survey123 form and verify the new work order appears correctly in the AirHub® Portal with all mapped fields.
Test Outbound Flow: Update a work order's status (or other allowed fields) in the AirHub® Portal and verify these changes are reflected accurately in the original Survey123 record's feature layer.
Edge Cases: Test various scenarios, including different field values and potential error conditions.
Power Automate Flow Ownership: A clear decision is needed on whether customers manage their own Power Automate flows (requiring detailed instructions from Airspace Link) or if Airspace Link creates/manages them using customer ArcGIS Online credentials.
Survey123 Form Customization: While customization is supported, a standardized schema (e.g., via a template provided by Airspace Link) will significantly reduce integration complexity.
Documentation: Capture detailed documentation as you go for each integration, particularly for unique customer configurations, to build repeatable processes.
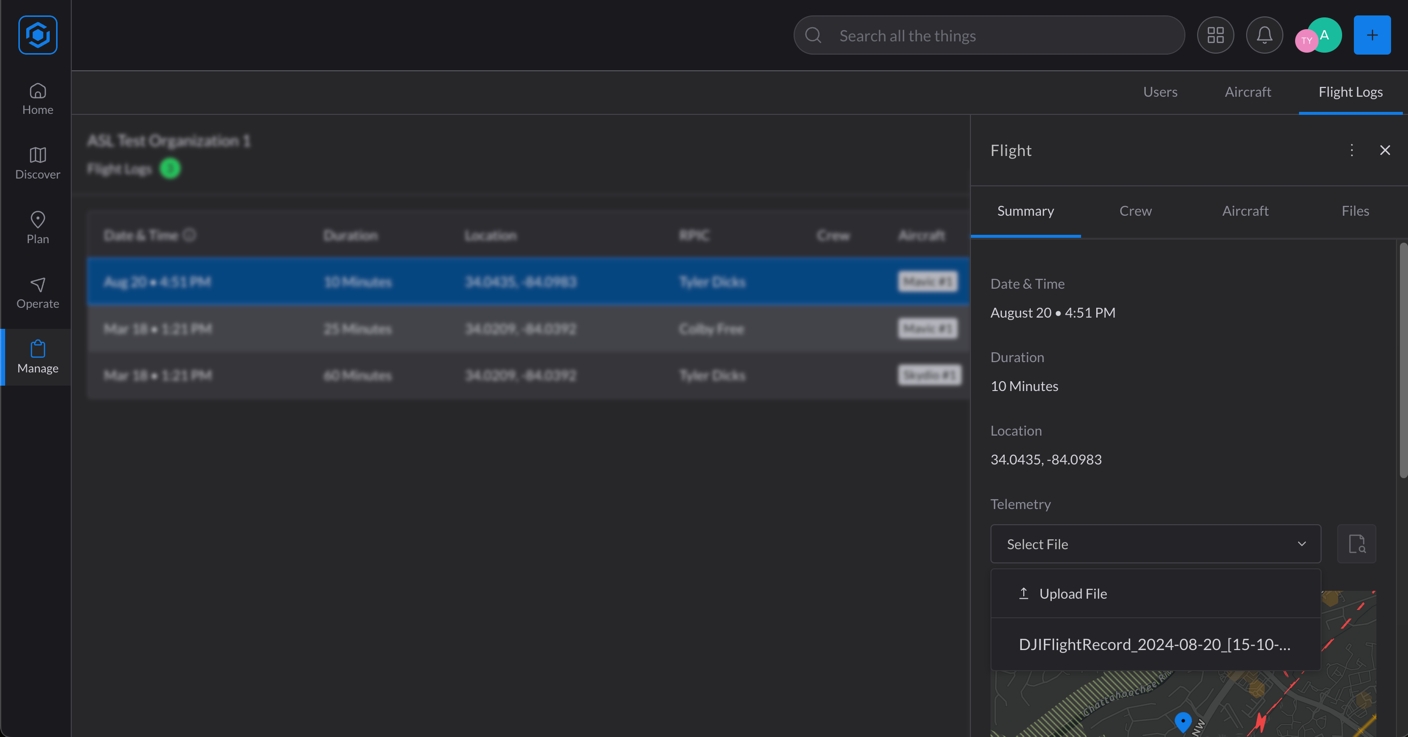
Introducing Flight Record Upload and Flight Log Linking in AirHub® Portal
This functionality empowers users with organization accounts to easily upload drone telemetry data and link it to their flight logs, capturing true flight activity, and providing precise and accurate data for compliance, asset monitoring, and pilot currency.
Supported Platforms
AirHub® Portal supports importing flight record data from various platforms, making it easy to integrate with your existing systems: DJI Flight Records: [“.txt”]
Pixhawk Aircraft: [“.bin”]
Other generic file types: [“.csv” and “.kml”]
How to Use
Suggestion on how to summarize the above below.
Using the flight record upload feature is straightforward:
Select or Create a Flight Log: Start by choosing an existing flight log or creating a new one in AirHub Portal.
Upload Your Flight Record: Upload your telemetry file directly to the selected flight log.
Link the Data: In the Summary tab, find the Telemetry section, select your uploaded file, and click the button to parse and link the telemetry data.
Once completed, your flight path and other key metrics will be automatically updated in your flight log.
How to Download Telemetry Files from Your Aircraft, Controller, or Ground Control System.
For DJI Aircraft
You can obtain telemetry files directly from the aircraft controller or through the DJI app:
Method 1: Downloading from the DJI App (DJI GO 4 or DJI Fly)
iOS device & Mac computer:
Connect phone to computer: You may need to have your phone “trust” the computer
In Finder, select the device: The phone should show up as a drive under “Locations”
Select “Files,” expand the DJI GO 4 or Fly folder, and click on “FlightRecords.”: This folder contains the DJI flight record files
Copy the FlightRecords folder to your desktop: Click and drag the “FlightRecords” folder from the finder window onto your desktop to create a copy of the FlightRecords folder on your computer.
Find the FlightRecord file associated with the desired Flight Log in AirHub® Portal. This file will be uploaded and parsed in the Flight Log.
iOS device & Windows computer:
Open iTunes and Connect phone to computer: You may need to have your phone “trust” the computer
Select device view: Click the phone icon to access file sharing
Download a copy of the DJI FlightRecords folder: Select “File Sharing,” select the correct DJI app, select the “FlightRecords” folder, scroll to the bottom of the screen, and select the “Save…” button to save a copy of the folder on your computer.
Find the FlightRecord file associated with the desired Flight Log in the AirHub Portal. This file will be uploaded and parsed in the Flight Log.
Android device
Connect phone to computer: You may need to have your phone “trust” the computer
For Mac computers, you may need to install an Android file transfer utility program.
Find the DJI app file folder for the desired DJI app. The specific path may depend on your device, app version, and desired DJI app. An example folder path would be: “…/internal storage/DJI/dji.go.v4/”
Method 2: Downloading from the DJI Controller (Smart Controller, RC Pro, CrystalSky)
Connect the Controller to Your Computer: Use a USB cable to connect your DJI controller to your computer. Ensure device-specific file transfer is enabled.
Access the Internal Storage: Once connected, the controller’s internal storage should appear on your computer as an external drive.
Navigate to the FlightRecord Folder: Open the drive and navigate to the folder where the telemetry files are stored. This is usually under the DJI/dji.go.v4/FlightRecord directory (for DJI Go devices) or DJI/com.dji.industry.pilot (for DJI Pilot devices).
For Pixhawk Aircraft
Access telemetry files from your Pixhawk flight controller in the following ways.
Method 1: SD Card (For flight controllers with removable SD card)
Remove SD Card from flight controller: Connect to computer
Download binary (.bin) log file: Log files located at /APM/LOGS
Method 2: Mission Planner
Connect vehicle to Mission Planner: Can connect via USB or radio
Access DataFlash Logs: Select “FLIGHT DATA” and beneath the primary flight display, select “DataFlagh Logs” and “Download DataFlash Log via Mavlink”
Select and download selected logs: Select desired log(s) for associated Portal flight logs
Method 3: QGroundControl
Connect vehicle to QGC: Can connect via USB or radio
Access DataFlash Logs: Select the main menu (“Q” icon in the top left), “Analyze Tools”, and will load “Log Download”, and may need to press “Refresh”
Select and download selected logs: Select desired log(s) for associated Portal flight logs
For Other File Types:
CSV File
Ensure the first record in the CSV file contains the field names, two of which must be “latitude” and “longitude”.
KML/KMZ File
Ensure the path flown is represented using the “LineString” data type.
The Power Automate flow calls the Airspace Link API to create a new work order in the AirHub® Portal.
The work order appears in the AirHub® Portal, mapped to the correct organization.
Outbound Flow (AirHub® Portal to Survey123 - Status Updates):
An update is made to a work order within the AirHub® Portal (e.g., status).
This triggers an internal AirHub® Portal process that calls a Power Automate Flow (Outbound).
This Power Automate Flow transforms Airspace Link's update schema into Survey123's expected format.
The Power Automate flow uses the "Update a Record in a Feature Layer" functionality to publish the update back to the original Survey123 record's feature layer.
The original Survey123 record is updated.
Customization: If they customize their fields, field mapping details (exact field names and their expected values) will be required to ensure correct translation to Airspace Link's schema.
Location Data Handling: Survey123 can typically collect geometry directly. Confirm how they are collecting location data (e.g., point, polygon) and ensure it aligns with Airspace Link's API requirements.
uniqueId: A unique, randomly generated ID (can be generated by Airspace Link).org_name: The exact organization name as defined in Auth0.
org_id: The unique organization identifier from Auth0.
outbound_url: The HTTP request URL generated from the inbound Power Automate flow (see Section 4.1).
Data Mapping: Implement logic to transform Survey123 fields into Airspace Link's standardized work order schema. This is typically straightforward if a template schema is used.
API Call: Add an action to make an HTTP POST request to the Airspace Link API to create the work order.
Target: Identify the specific Survey123 feature layer and the record to update (e.g., using a unique ID passed from AirHub® Portal).
Field Mapping: Map Airspace Link update fields (e.g., status) to the corresponding fields in the Survey123 feature layer. Some status value mapping may be required.
Find the FlightRecord file associated with the desired Flight Log in the AirHub Portal. This file will be uploaded and parsed in the AirHub Flight Log.
This guide outlines the process for integrating ServiceNow, an external work order management system, with the AirHub® Portal. The goal is to establish a seamless two-way flow of work order data: creating work orders in the Portal from ServiceNow and reflecting Portal status updates back into ServiceNow.
The integration involves a two-way communication setup:
Inbound Flow (ServiceNow to AirHub® Portal - Work Order Creation):
A record is created or updated in ServiceNow.
This triggers a ServiceNow Business Rule to send an HTTP request containing work order data.
A Power Automate Flow (Inbound) receives this request, transforms the ServiceNow data format into Airspace Link's standard work order schema.
Before configuring the integration, essential information and access are required from the customer:
Familiarize yourself with their specific ServiceNow instance and how they use it for work orders.
Understand their existing intake forms and the fields they use.
ServiceNow Instance URL: The base URL of their ServiceNow instance.
User Credentials: A dedicated user account within their ServiceNow instance for integration purposes.
Required Permissions: This user needs permissions to:
Draft Inbound Power Automate Flow: Create a Power Automate flow designed to receive HTTP requests from the customer's ServiceNow Business Rule. This flow will generate a unique URL.
Draft Outbound Power Automate Flow: Create a Power Automate flow designed to receive updates from the Airspace Link Portal and publish them back to ServiceNow.
Obtain Outbound URL: For the outbound flow (Airspace Link to ServiceNow), note the unique HTTP request URL generated by Power Automate. This will be used in Airspace Link's org.json configuration.
Navigate to the org.json configuration file in the Airspace Link GitHub repository (specific location to be provided by engineering).
For each environment (e.g., Development, Staging, Production), add a new entry for the customer's organization.
Required Data for Each Organization Entry:
Objective: To trigger a send of ServiceNow work order data to Airspace Link's inbound Power Automate flow.
Action: Configure a new Business Rule within ServiceNow.
Table: Tie this rule to the specific ServiceNow table where work orders are managed.
Objective: To receive ServiceNow data, transform it, and send it to the Airspace Link API.
Action: Configure the Power Automate flow:
Trigger: Set to "When an HTTP request is received".
Field Definition: Define the expected fields from the ServiceNow request.
Objective: To receive work order updates from AirHub® Portal and apply them to ServiceNow records.
Action: Create a Scripted REST API in ServiceNow.
Endpoint: Define a unique, external endpoint that can accept calls from outside ServiceNow.
Thorough testing is crucial to ensure the two-way integration works as expected.
Test Inbound Flow: Create/update a work order in ServiceNow and verify it appears correctly in the AirHub® Portal with all mapped fields.
Test Outbound Flow: Update a work order's status, notes, or deliverable URL in the AirHub® Portal and verify these changes are reflected accurately in the original ServiceNow record.
Field Mapping Complexity: Be prepared for detailed conversations with customers about their field definitions and values, especially for custom fields that may require specific handling.
Power Automate Flow Ownership: A clear decision is needed on whether the customer or Airspace Link will own and manage these Power Automate flows. This impacts necessary access and instruction levels.
Documentation: Capture detailed documentation as you go for each integration, particularly for unique customer configurations, to build repeatable processes.
The Power Automate flow calls the Airspace Link API to create or update the work order in the AirHub® Portal.
The work order appears in the AirHub® Portal, mapped to the correct organization.
Outbound Flow (AirHub® Portal to ServiceNow - Status Updates):
An update is made to a work order within the AirHub® Portal (e.g., status, notes, deliverable URL).
This triggers an internal AirHub® Portal process that calls a Power Automate Flow (Outbound).
This Power Automate Flow transforms Airspace Link's update schema into ServiceNow's expected format.
The Power Automate flow publishes the update to a designated ServiceNow Scripted REST API endpoint.
The original work order record in ServiceNow is updated.
Create Scripted REST APIs.
Update tables
Field Mapping Details: For ALL fields in their intake form that need to be integrated with AirHub® Portal:
Exact field names (as they appear in ServiceNow).
All possible values for each field, including their underlying numeric or exact database values (not just the displayed text labels).
Example: "Pending" might have an underlying value of "-5". These often require direct API calls or specialized ServiceNow views to determine.
Note: This often requires experimentation (sending API requests and observing transformations) or direct access to their database schema views within ServiceNow.
Custom Field Behavior: Identify any custom fields that behave unusually (e.g., work_notes field requires specific update methods via PATCH rather than direct assignment).
Location Data: Understand how they currently define operation locations (e.g., text addresses, no geometry).
uniqueId: A unique, randomly generated ID (can be generated by Airspace Link).org_name: The exact organization name as defined in Auth0.
org_id: The unique organization identifier from Auth0.
outbound_url: The HTTP request URL generated from the outbound Power Automate flow (see Section 4.1).
Active and Advanced fields are both checkedConditions: Set conditions for when the rule fires (e.g., on insert, update, or delete of a record).
Script: In the Advanced tab, implement a custom script within the Business Rule to:
Extract relevant fields from the ServiceNow record.
Construct an HTTP POST request.
Send this request to the unique URL of the inbound Power Automate flow.
Data Mapping: Implement logic to transform ServiceNow's field names and values into Airspace Link's standardized work order schema (e.g., mapping state from "-5" to "Pending").
API Call: Add an action to make an HTTP POST or PUT request to the Airspace Link API to create or update the work order.
ASL API URL: https://airhub-api-dev.airspacelink.com/v1/workorder/webhook/{uuid} where uuid is the unique organization id contained in the org.json configuration file
PATCH for updates).Resource path: Note the resource path generated. This will be used by the outbound Power Automate flow to publish updates to ServiceNow.
Script: Implement a script within this API to:
Receive the update request from the outbound Power Automate flow.
Identify the specific ServiceNow record to update (e.g., using a unique ID passed in the request).
Update the relevant fields (e.g., status, notes, deliverable URL) in that record.
Handle any custom field behaviors as identified in Section 3.2.
// Example script

(function executeRule(current, previous /*null when async*/) {
    var restMessage = new sn_ws.RESTMessageV2();
    restMessage.setEndpoint('https://prod-72.westus.logic.azure.com:443/workflows/uniquePowerAutomateUrlAbc123');
    restMessage.setHttpMethod('POST');

    // Send the current work order as JSON
    var requestBody = {
        taskNumber: current.number.toString(),
        priority: current.priority.toString(),
        state: current.state.toString(),
        shortDescription: current.short_description.toString(),
        description: current.description.toString(),
        sys_id: current.sys_id.toString(),
		dueDate: current.due_date.toString(),
        link: current.getLink(),
		location: current.location.toString(),
		locationDescription: current.u_location_description.toString()
    };

    restMessage.setRequestBody(JSON.stringify(requestBody));
	restMessage.setRequestHeader('Content-Type', 'application/json');
    var response = restMessage.execute();
})(current, previous);(function process(/*RESTAPIRequest*/ request, /*RESTAPIResponse*/ response) {
// Extract the data from the request body
var requestBody = request.body.data;
// Extract the unique identifier of the record to update from the request body
var idNumber = requestBody.id;
// Create a new GlideRecord object for the 'sc_task' table
var gr = new GlideRecord('sc_task');
// Attempt to retrieve the record with the specified 'number' (idNumber)
if (gr.get('number', idNumber)) {
// Iterate over each field in the request body
for (var field in requestBody) {
// Check if the field is a direct property of requestBody
if (requestBody.hasOwnProperty(field)) {
// Set the value of the field in the GlideRecord object
gr.setValue(field, requestBody[field]);
// Handle special/unique fields separately
if (field == 'work_notes') {
// Set the 'work_notes' field specifically
gr['work_notes'] = requestBody[field];
}
}
}
// Disable workflow processing for this update to prevent it from firing other triggers
gr.setWorkflow(false);
// Update the record in the database
gr.update();
// Set the response status to 200 (OK) and return a success message
response.setStatus(200);
response.setBody({ message: 'Record updated successfully' });
} else {
// If the record is not found, set the response status to 404 (Not Found)
response.setStatus(404);
response.setBody({ error: 'Record not found' });
}
})(request, response);